Rockbox Image Optimisation
When producing Rockbox themes with large feature-sets, images can quickly become a bottleneck both in terms of filesize as well as graphical quality. There are many ways to address these issues, however in this guide I will cover the best practices I have discovered and incorporated into my toolbox.
The Bitmap image format
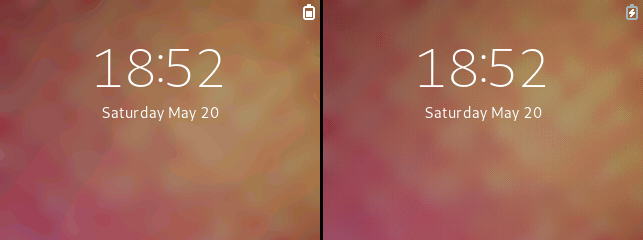
Rockbox’s primary image format is the Bitmap. Versions 3 and 4 of the bitmap spec are recognised, while any lower specs are not. The wiki states that 1-bit, 24-bit and 32-bit Bitmaps are supported, however from experience 16-bit is also acceptable. I bring up 16-bits as all images used by Rockbox are converted into 16-bit colour regardless. This brings up the first issues. When this conversion is done, no dithering is applied, leaving an often unsavoury and harsh result. By pre-processing our images, we can not only achieve better looking results but also much smaller filesizes.
Optimising with GIMP
The best free method of optimising images I have found is with GIMP. It has a wide range of dithering algorithms that produce nice results, as well as a predictable colour indexing that consistently provides small file sizes. The only downside to GIMP is that the steps cannot be automated, and thus must be repeated each time an image needs to be converted.
Colour dithering
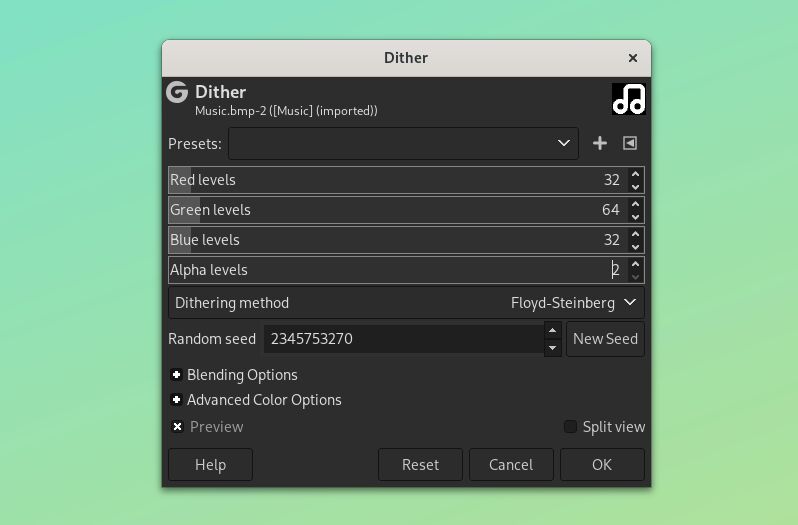
To produce better looking images in Rockbox, we must pre-process our images by limiting the colour palette and use dithering to blend these together. We find this tool by going to Colors > Dither…
Inside, it may seem a little complicated at first, but understanding what we need should help. Rockbox uses a 16-bit colorspace, we can get a good visualisation of this by using Rockbox’s built-in colour tools in the theme settings. Both the Red and Blue colours are limited to just 32 options, while Green has 64. This is known as RGB565. If we take these maximum limits, and input them into the Red, Green and Blue levels of our Dither tool in GIMP, we can dither our image in this colorspace. The rest of the options are not of importance, except for Dithering method. This changes the dithering style, and is entirely up to you and what you think looks best.
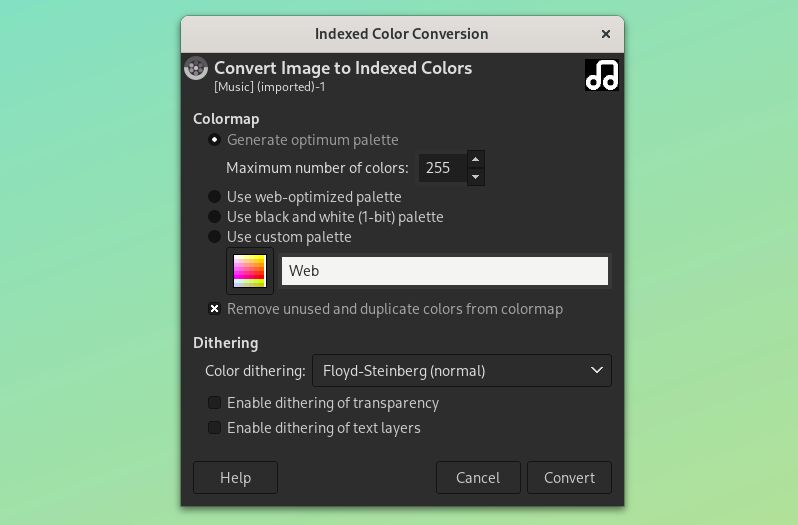
Indexed Colors
The simplest step to achieving optimised filesizes is the Indexed Color tool. This is found by going to Image > Mode > Indexed. Once in we, have several options available. Under Colormap we can choose what limitations we wish to put on the image’s palette. For 1-bit images, the black and white palette is perfect and you shouldn’t need any other steps.
For colour images, we use Generate optimum palette which lets us set a number. This number, however, is only a maximum. If we select Remove unused and duplicate colors from colormap, GIMP will automatically trim the Colormap down to only the colours used by the image. In the second part of the dialog, we can choose what dithering to use. This can be purely preference based, however for small, low-colour images like icons I recommend not using dithering at all and setting it to None.
Exporting from GIMP
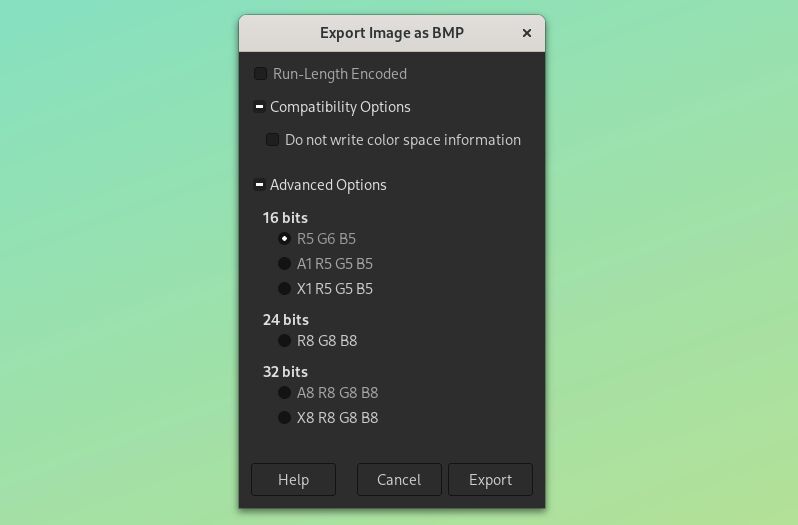
Exporting as a Bitmap in GIMP provides several options. The Advanced Options dialog will be unavailable if you have used indexed colour, but if you haven’t, the options dictate the format of your bitmap image. Generally you want R5 G6 B5 under the 16 bits list, however if you are using true transparency (not the magenta-based masking) A8 R8 G8 B8 under 32 bits is used.
The other option available is the Compatibility Options. I uncheck Do not write color space information, this saves some bytes in filesize and is also unnecessary since Rockbox will convert our image’s colour space regardless
Automating the Process
While GIMP is useful, the amount of manual inputs that need to be done can be time consuming and tedious in projects with a large number of assets. To counter this, I attempted to produce a script using ImageMagick that could automate the process. The project was somewhat a success, however ImageMagick proved to be the wrong tool for the job (which I’ll talk a bit more about at the end). I’ve split it into several different scripts based on the job and results desired.
Background Images
These scripts take your backdrop images, 320x240 pixels, and converts them into the RGB565 bitmaps. If you wish to understand to script options chosen, -type palette turns on indexed colour, -compress none turns off compression, which isn’t supported by Rockbox, and the final format and define section outputs the image as a version 3 bitmap.
There’s two versions here, one uses ordered dithering and the other Floyd-Steinberg dithering. Floyd Steinberg does require an image to use as a colormap. I’ve used this png of 16-bit colourspace.
These two scripts will both produce colour-accurate bitmaps that are always 77.9kBs large. They can also be used on other images, however I will cover why you mightn’t want to.
# Floyd Steinberg Dither
mogrify -dither FloydSteinberg -remap RGB_16bits_palette.png -compress None -type palette -format bmp -define bmp:format=bmp3 INPUT.png

# Ordered/Positioned Dither
mogrify -ordered-dither o8x8,32,64,32 -compress None -type palette -format bmp -define bmp:format=bmp3 INPUT.png
Icon Images
Generally, small icons do not need to be dithered with a pattern. For this case, I made a script that converts images with a basic, direct dither.
One thing to note here is the optional -kmeans 16 option. This limits the colormap of the image, and can give you a decent filesize reduction. However it’s worth testing different values for their results, hence this script is non-destructive and keeps the original input (unlike mogrify, which will overwrite the original image if it is the same filetype). You can still get a respectable filesize without using kmeans, it’s also worth mentioning that sometimes it doesn’t work (and I don’t know why, but the feature is buggy apparently).
convert INPUT.png -kmeans 16 -ordered-dither 1x1,32,64,32 -compress None -type palette BMP3:OUTPUT.bmp Mix and Match
You might find yourself in situations not covered by these scripts, for example small icon images with a lot of colour you want dithered in a fancy style. In this case, mix and match the options! The optional -kmeans can work with the background image scripts, and visa versa.
1-bit bitmaps
A quick and simple script to convert images into 1-bit bitmaps with the smallest size. The -type bilevel converts them to indexed 1-bit bitmaps with just 2 colours (black and white)
mogrify -depth 1 -type bilevel -compress None -type palette -format bmp -define bmp:format=bmp3 INPUT.pngWhere ImageMagick failed
I ran into more than a few issues with Imagemagick making these scripts. The biggest was certain sized images having bigger filesizes than the exact same processes in GIMP, just 600-1000 bytes. Which may not be a problem for some but in a project pushing the extremes of Rockbox’s file upload limits, these small gains can help a lot. I tracked this issue down to the colormaps of the files containing a large number of junk entries, the colormap would be set to 255 and any image with less would have the remainding space filled with these junk entries. Another issue with Imagemagick is the lack of dithering algorithms, just 2 compared to GIMP having around 7-8.
My solution for this will be to create my own image conversion tool specifically for making these Rockbox-targetting bitmaps. The backbone will be makew0rld’s dither library. Having this level of fine control over the conversion should hopefully allow for the creation of incredible accurate images with the smallest file sizes possible (even smaller than GIMP!) I’ll probably get to making this the next time I encounter the tedium of image conversion.